How To Draw A Knight Helmet
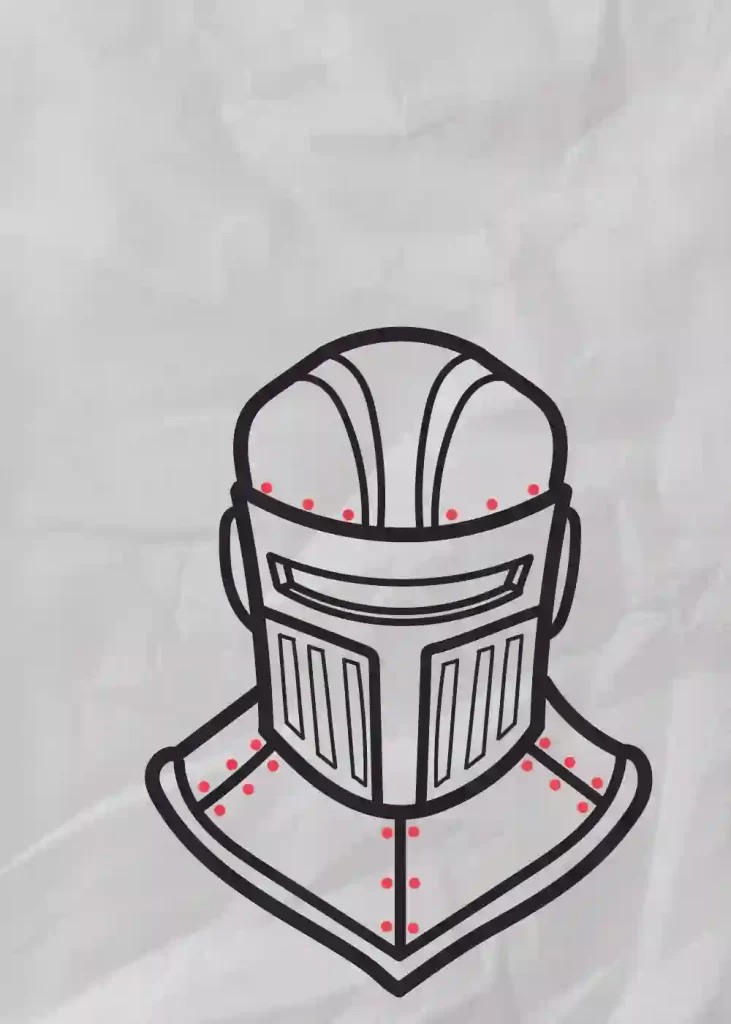
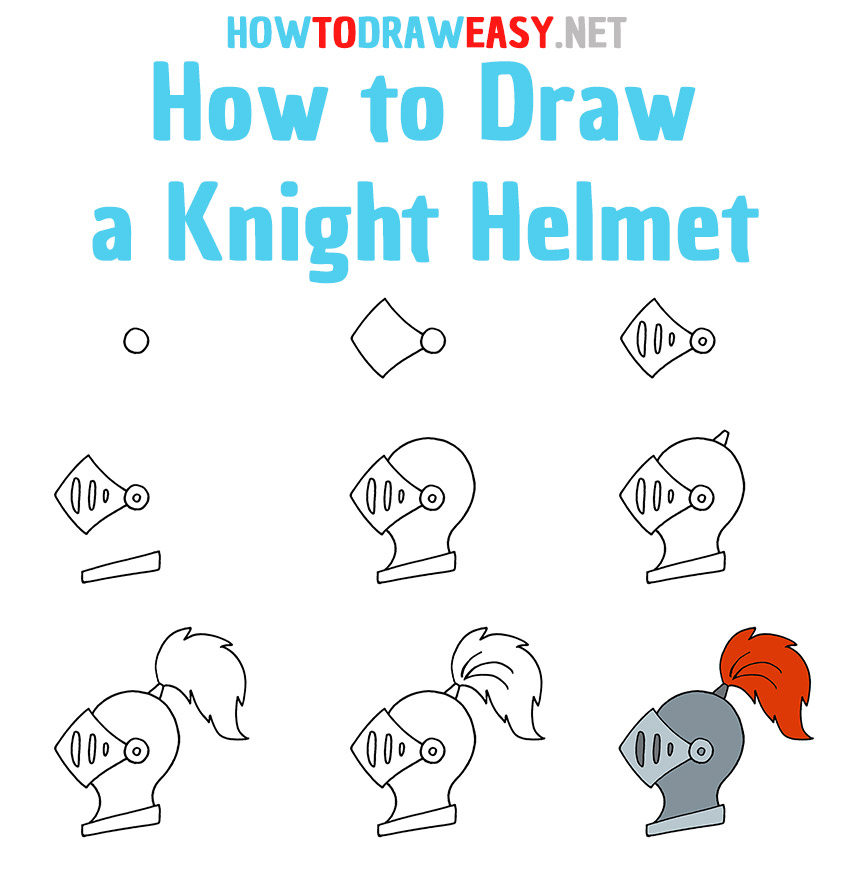
How To Draw A Knight Helmet - Now, draw the back portion of the helmet. Sketch the shield, sword and additional armor pieces if needed. Once you have drawn these aspects, you can then use some curved lines to add the ponytail coming from the top of the helmet. A knight is known to be the classic warrior who used to fight a battle with a horseback. This is the most impressive part of the knights armor. These slits allow ventilation and visibility for the knight. Draw a diagonal line across the side of the gorget, and draw two small circles beside it. A pencil and eraser, a ruler, and a piece of paper. Within the circle, draw two curved lines. Web to begin, gather all the materials you’ll need: Depict the top of the suit. Near the previously drawn head, neck, and shoulders of the knight, draw a few straight and curved lines, as shown in the figure. To draw the slits for the eyes and other elements of the helmet, use straight lines of different lengths. Sketch the shield, sword and additional armor pieces if needed. Draw a diagonal line across the side of the gorget, and draw two small circles beside it. Web to begin, gather all the materials you’ll need: Another free fantasy for beginners step by step drawing video tutorial. Sketch the head of the knight. Use a fine tipped drawing tool to redefine the sketch (a black sketch or a fine tipped marker). First, enclose a curved rectangle near the top of the helmet. Web drawing a knight’s helmet today. These slits allow ventilation and visibility for the knight. First, enclose a curved rectangle near the top of the helmet. Make sure the lines on each side meet in a point. This is the most impressive part of the knights armor. Join the two ends of the rectangle together, putting it on your head or the other person’s head to see where you’ll need to attach it. Web hi everyone, !welcome to moshley drawing channel. Web follow the step by step guide to draw the helmet. First, enclose a curved rectangle near the top of the helmet. This will be the. Subscribe to our youtube channel: Another free fantasy for beginners step by step drawing video tutorial. The helmet will be long and a bit rounded, and the hole for the eyes on the visor will be shaped like a sharp t. These slits allow ventilation and visibility for the knight. Extend a set of straight, parallel lines downward from the. Web start drawing the knight costume. In this video, we will show you how to draw a knight helmet easy step by step with easy drawing tutorial st. Use a fine tipped drawing tool to redefine the sketch (a black sketch or a fine tipped marker). To continue this knight’s helmet drawing, we will be adding some small details around. Web draw with me a knight helmet and learn how to draw simple drawings for beginners. This tutorial shows the sketching and drawing steps from start to finish. A pencil and eraser, a ruler, and a piece of paper. Sketch the knight's armor and clothing (research on different types of armor for references). Make sure the slits taper slightly towards. First, let’s start with the ear sections. The shape of the head can be either round or oval. It was two pieces of plate molded to fit the knight's body and it was usually in two pieces (front and back () that were buckled together. Extend a curved line from the bottom of the “u” shaped line. Web start drawing. The helmet will be long and a bit rounded, and the hole for the eyes on the visor will be shaped like a sharp t. Within the faceguard area, draw a series of vertical slits. This will be the visor of the helmet. Another free fantasy for beginners step by step drawing video tutorial. Then, enclose a curved square shape. Web learn to draw a knight helmet a very quick and easy version with this video loblogue. Sketch the knight's armor and clothing (research on different types of armor for references). Depict the top of the suit. This is the most impressive part of the knights armor. Make sure you have plenty of room to draw, as you’ll need to. This tutorial shows the sketching and drawing steps from start to finish. The helmet will be long and a bit rounded, and the hole for the eyes on the visor will be shaped like a sharp t. Then, use overlapping curved lines to begin sketching the plume. Sketch the shield, sword and additional armor pieces if needed. Draw a circle. Make sure the circle is centered on your paper to leave enough space for the body and other details. It was two pieces of plate molded to fit the knight's body and it was usually in two pieces (front and back () that were buckled together. Make sure you have plenty of room to draw, as you’ll need to draw. Draw the openings in the visor. We will start with the helmet of your knight in the first step of this guide on how to draw a knight. Web to begin, gather all the materials you’ll need: You can really change a lot of the parts of the helmet, they come in all sorts of shapes and designs! To continue this knight’s helmet drawing, we will be adding some small details around the ears as well as the base of the helmet that would go over the shoulders. How to draw a knight. These could be very specialized with lparts that stuck out as a way to guide weapons away from the body. In this video, we will show you how to draw a knight helmet easy step by step with easy drawing tutorial st. First, let’s start with the ear sections. It was two pieces of plate molded to fit the knight's body and it was usually in two pieces (front and back () that were buckled together. Make sure you have plenty of room to draw, as you’ll need to draw the entire helmet. Web drawing a knight’s helmet today. Then, use overlapping curved lines to begin sketching the plume. Tape the sides of the helmet together so it’s whole. Web on the side of the knight’s helmet, draw a rivet that holds the faceguard. Web start drawing the knight costume.
How to Draw a Knight Helmet for Kids Drawing tutorial easy, Knights
How To Draw A Knight Helmet Easy Drawing Storiespub
How to Draw a Knight Helmet for Kids Draw for Kids

Anderson Evestan43

How To Draw A Knight’s Helmet A Step by Step Guide in 2024 Helmet

How to Draw a Knight Helmet Really Easy Drawing Tutorial

Knight Helmet Drawing Front View

Cartoon Knight Helmet

How to Draw a KNIGHT HELMET YouTube

How To Draw A Knight’s Helmet A Step by Step Guide Knight drawing
Sketch The Helmet (The Bucket Type Helmet Is Used Here).
Once You Have Drawn These Aspects, You Can Then Use Some Curved Lines To Add The Ponytail Coming From The Top Of The Helmet.
Subscribe To Our Youtube Channel:
Extend A Set Of Straight, Parallel Lines Downward From The Curved Lines.
Related Post: